Documentation
CinemaOS — Setup & User Guide
Your complete reference for installing, configuring, and using CinemaOS on your home theater PC.
1. Introduction
CinemaOS is a local home-theater launcher for Windows. It runs a small embedded web server on your PC and opens a purpose-built browser home page that lets you launch streaming services, local applications, and your personal video library — all from a single, TV-friendly interface.
Everything runs locally. No account, no cloud sync, no data leaves your machine.
Core Components
| Component | What it does |
|---|---|
CinemaOS Launcher (CinemaOS.exe) |
Windows tray app; hosts the embedded web server; manages browser lifecycle. |
| Browser Extension | Injects the toolbar into streaming-service pages; bridges navigation events between the home page and the browser. |
| CinemaOS Home Page | AngularJS web app served at http://localhost:3000; this is what you see on your TV. |
2. System Requirements
↑ Back to top| Requirement | Minimum |
|---|---|
| OS | Windows 10 (64-bit) or Windows 11 |
| Browser | Google Chrome or Microsoft Edge (Chromium) |
| Network | Local network access only; no internet required for the launcher itself |
| .NET Runtime | Bundled with the installer — no separate install needed |
3. Installation
↑ Back to top3.1 Run the Installer
- Double-click
CinemaOS-Setup.exeto start the installer. - Accept the license agreement and choose an install directory. The default —
C:\Program Files\CinemaOS— is recommended. - Click Install. The installer copies application files, creates a Start Menu shortcut, and optionally registers CinemaOS to launch at Windows startup.
- Click Finish. CinemaOS launches automatically on completion.
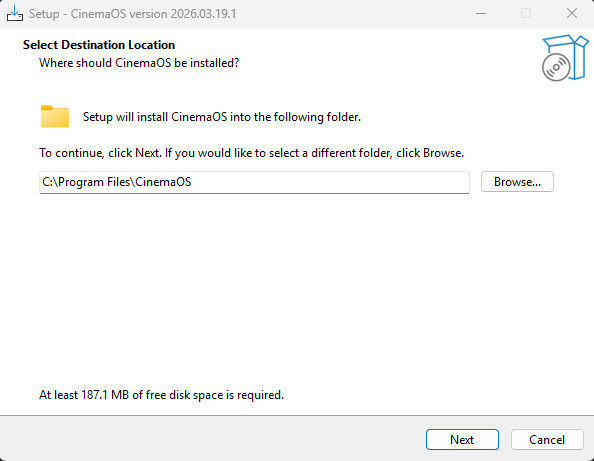
Program Files location will prompt a UAC elevation request.
3.2 What Gets Installed
config.db and torrents.db are created on first launch, not by the installer.
4. First Launch & Profile Selection
↑ Back to topWhen CinemaOS starts for the first time — or whenever you click Switch Profile from the tray — the Profile Selection window appears.
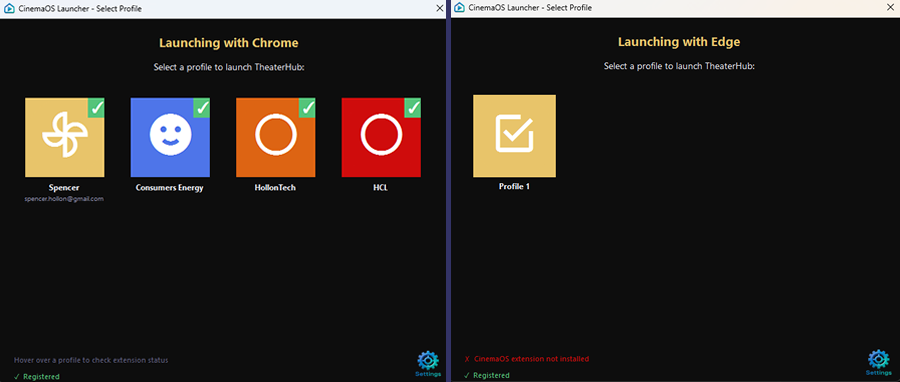
4.1 What the Profile Selector Shows
- Browser name — the browser CinemaOS detected (Chrome or Edge).
- Profile cards — one card per browser profile found on your system.
- Extension indicator — a checkmark badge if the extension is installed; a warning badge if it is not.
4.2 Choosing a Profile
- Click the profile card you want CinemaOS to use. A dedicated browser profile kept separate from everyday browsing is recommended.
- CinemaOS launches the browser with that profile, navigates to
http://localhost:3000, and the home page appears.
4.3 Profile Persistence
CinemaOS remembers the last-used profile. On subsequent launches it goes directly to that profile without showing the selector again. To change profiles, use Switch Profile from the tray icon menu (see Section 6).
5. Installing the Browser Extension
↑ Back to topThe browser extension makes the toolbar appear on streaming-service pages and enables seamless navigation from the home page. It must be installed in the same browser profile you selected in the previous step.
5.1 Checking Extension Status
- Look at your profile card in the Profile Selector — a ✓ badge means the extension is already installed in that profile.
- After the home page loads, a brief toast notification "Extension connected!" confirms the extension is live and no further action is needed.
5.2 Installing the Extension (Normal Method)
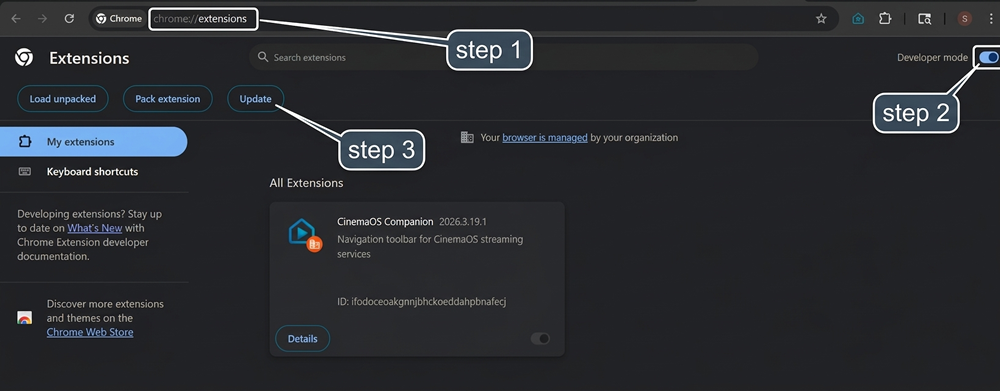
The CinemaOS installer registers the extension with Chrome and Edge via a packed CRX file and Windows registry policy. In most cases the browser just needs a nudge to pick it up:
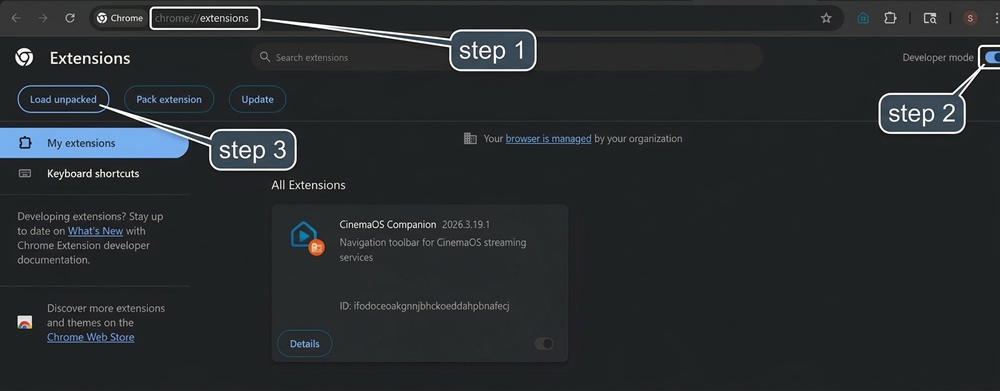
- Open Chrome and navigate to
chrome://extensions, or open Edge and navigate toedge://extensions. - Click the Update button at the top of the page (Chrome) or the Update link in the left sidebar (Edge). The browser re-scans its registered extension sources.
- The CinemaOS extension will appear in the list automatically.
- Confirm the extension is enabled — the toggle next to it should be blue/on.
5.3 After a CinemaOS Upgrade
The installer replaces the packed CRX file on disk and updates the registry entry. Tell the browser to pick up the new version:
- Navigate to
chrome://extensions(oredge://extensions). - Click Update (Chrome) or the update/reload control (Edge).
- The CinemaOS extension version number on its card will update to match the new release.
5.4 Fallback: Load Unpacked Extension
Use this method only if the normal installer-based approach did not work — for example when running CinemaOS from a non-standard install path, when browser policy prevents CRX registration, or when testing a development build.
Chrome
- Navigate to
chrome://extensions. - Enable Developer mode using the toggle in the top-right corner.
- Click Load unpacked.
- Browse to the
extensionfolder inside your CinemaOS install directory (e.g.,C:\Program Files\CinemaOS\extension). - Click Select Folder. The CinemaOS extension will appear in the list with its icon.
- Confirm the extension is enabled (the toggle next to it should be blue/on).
Microsoft Edge
- Navigate to
edge://extensions. - Enable Developer mode using the toggle on the left sidebar.
- Click Load unpacked.
- Browse to the
extensionfolder inside your CinemaOS install directory. - Click Select Folder.
extension folder after loading it. Chrome/Edge track the folder path and will disable the extension with an error if the path changes. If you need to move it, remove the old entry and use Load unpacked again from the new location.
5.5 Pinning the Extension Icon (Optional)
Pinning the CinemaOS extension icon to the browser toolbar gives you quick visual confirmation it is active and lets you click it to return to the CinemaOS home page from any streaming-service tab.
- Click the puzzle-piece Extensions icon in the Chrome/Edge toolbar.
- Find CinemaOS in the list.
- Click the pin icon next to it.
6. The System Tray Icon
↑ Back to topOnce CinemaOS is running, a small icon appears in the Windows system tray (notification area, bottom-right of the taskbar). This icon is your control center for the launcher.
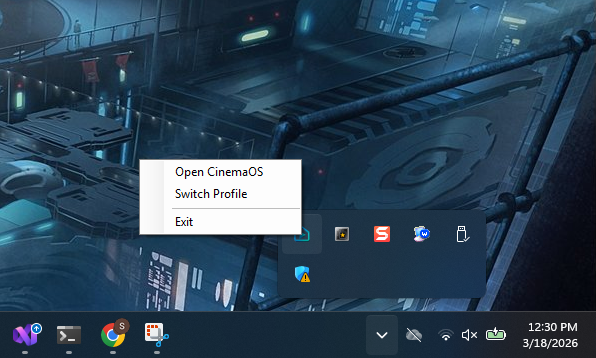
6.1 Tray Actions
| Action | Result |
|---|---|
| Double-click the icon | Opens CinemaOS (relaunches browser if closed; expands toolbar if browser is open) |
| Right-click → Open CinemaOS | Same as double-click |
| Right-click → Switch Profile | Re-shows the Profile Selector |
| Right-click → Settings | Opens the Launcher Settings dialog |
| Right-click → Exit | Shuts down CinemaOS completely |
6.2 The Browser Home Key
If you use an air mouse or media remote with a Browser Home button (VK_BROWSER_HOME), CinemaOS intercepts it automatically:
- If the browser is open: expands the CinemaOS toolbar overlay.
- If the browser is closed: relaunches the browser and navigates to the home page.
7. Launcher Settings (Windows Dialog)
↑ Back to topOpen via right-click tray icon → Settings (or the gear icon on the Profile Selector). Saving changes in this dialog restarts the application automatically so settings take effect.
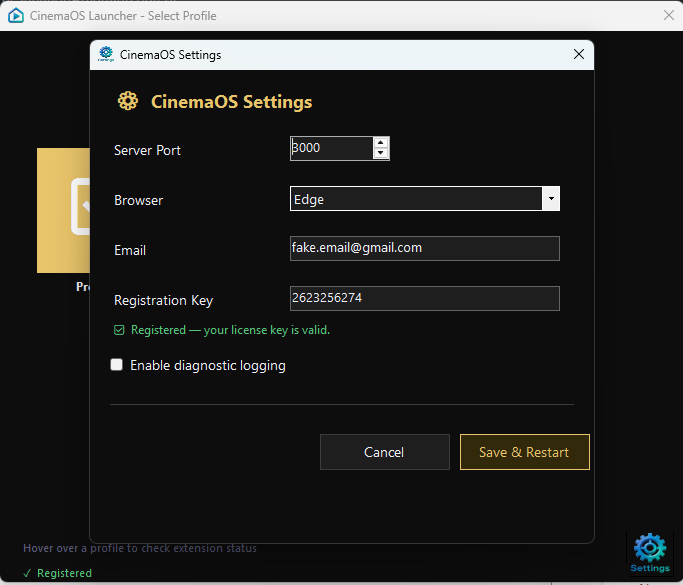
7.1 Server Port
The port the embedded web server listens on. Default: 3000 (http://localhost:3000). Valid range: 1024–65535. Change this if port 3000 is already in use on your PC.
7.2 Browser
Selects which browser CinemaOS launches. Auto-detect (default) prefers Chrome then Edge. Override to force a specific browser.
7.3 Email & Registration Key
Enter the email and key from your purchase confirmation. Status feedback:
- "No registration details entered" — trial mode.
- "Validating…" — key is being checked.
- "✓ Registered to [email]" — all features unlocked.
- "✕ Invalid key" — key does not match email or has expired.
7.4 Enable Diagnostic Logging
When checked, CinemaOS writes a detailed log file to:
Leave off during normal use. Enable only when investigating a problem. See Section 21 — Troubleshooting for details.
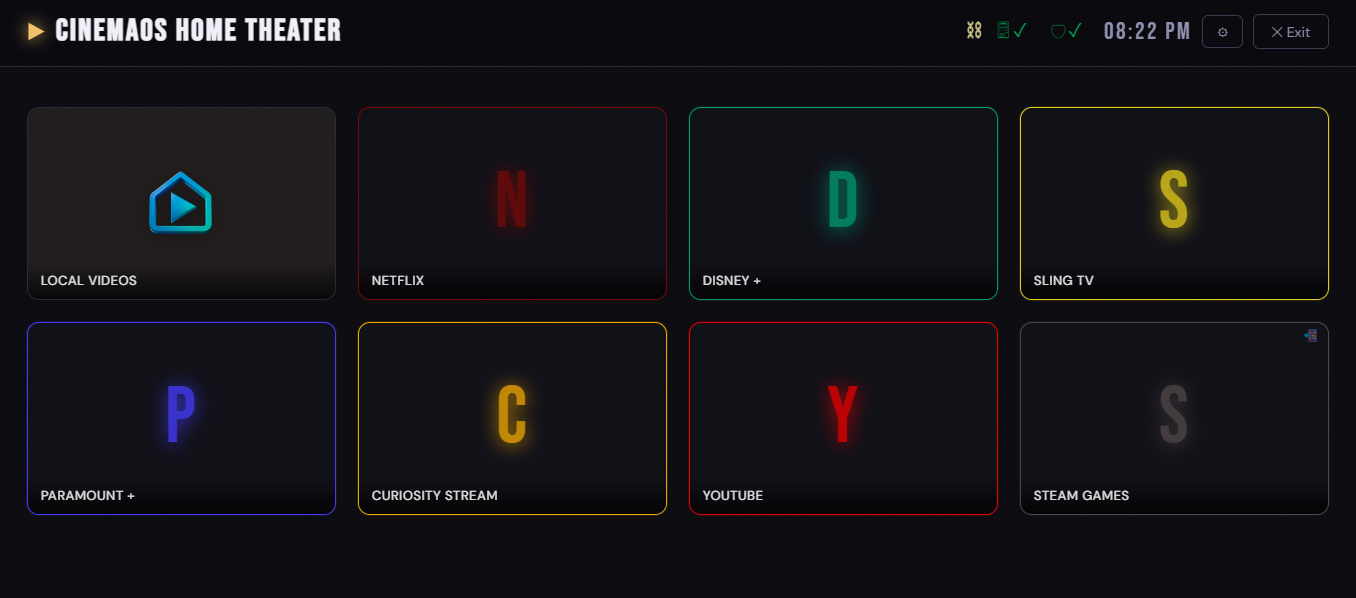
8. The CinemaOS Home Page
↑ Back to topAfter a successful launch your browser opens at http://localhost:3000 and the CinemaOS home page fills the screen.
8.1 Layout Overview
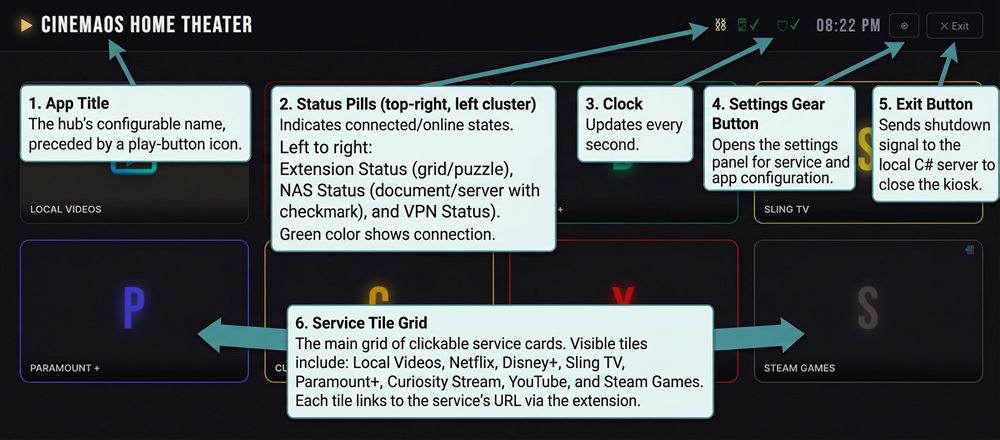
- Service tiles — large clickable cards, each opening a streaming service URL or launching a local app.
- Local Videos — a special built-in tile that appears automatically when video files are found in a configured directory.
- Gear / settings menu (top-left) — opens all settings panels.
- Clock (top-right) — updates every second.
8.2 Status Indicators
Two status pills in the header show at-a-glance connectivity state:
- VPN status: ● VPN Connected ● VPN Off — click to toggle connect / disconnect.
- NAS status (when NAS is enabled): ● NAS Online ● NAS Offline — click to wake or shut down the NAS.
8.3 Opening a Service
Click any service tile to navigate to that service. If the extension is installed, the CinemaOS toolbar overlay is available on that page. Press the Browser Home key at any time to return to the home page.
8.4 The Toolbar on a Streaming Service Page
Once you navigate to a configured streaming service, the browser extension injects a toolbar at the very top of the page. This is the primary way to navigate back to the home page or switch services without touching a keyboard.
How the toolbar appears
The toolbar starts collapsed — visible only as a thin golden accent line pinned to the top edge of the browser window. In this state it does not interfere with the streaming service's own UI.
Expanding the toolbar
- Mouse / pointer — move your cursor to the very top of the screen and hover over the golden pill. The toolbar slides down into view automatically.
- Air mouse / remote Browser Home button — press the
Browser Homekey (VK_BROWSER_HOME). CinemaOS detects this signal and expands the toolbar from wherever you are on the page. See Section 6.2 for details.
The toolbar collapses again automatically after your cursor has been below it for approximately one second.
Toolbar controls
| Control | What it does |
|---|---|
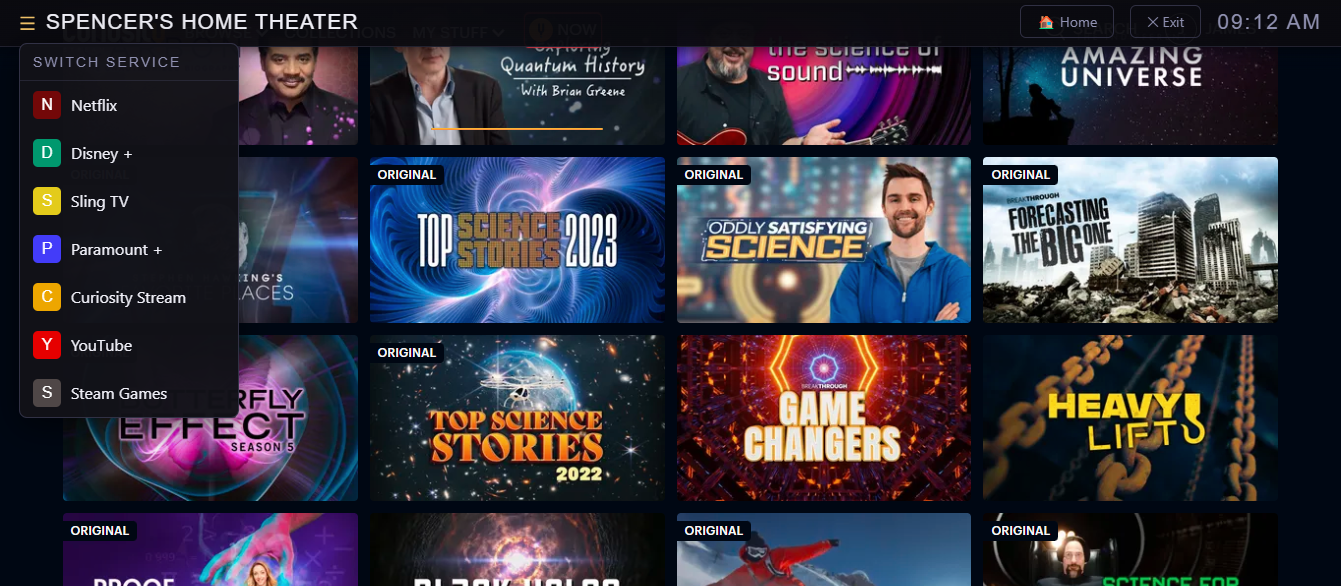
| ☰ menu icon | Opens the Switch Service dropdown — lists all configured services with their icons/colors. Click any service to navigate to it directly. |
| Hub title (e.g., "CinemaOS") | Click to return to the CinemaOS home page. |
| Home button | Returns to the CinemaOS home page. |
| Exit button | Shuts down CinemaOS completely — closes the browser and stops the embedded server. |
| Clock | Current time in HH:MM format, updating every second. |
Switching services from a streaming page
- Hover over the top-left of the screen (or press the Browser Home button) to expand the toolbar.
- Click the ☰ icon or the hub title to open the Switch Service menu.
- Click the service you want. The browser navigates there immediately and the toolbar is re-injected on the new page.
Full toolbar vs. Plain toolbar
- Full toolbar (default) — a web component with responsive styling designed for TV displays. Font sizes and toolbar height scale automatically across 600 px, 1024 px, and 1920 px breakpoints.
- Plain toolbar — a lighter-weight variant with identical controls but simpler styling. Use this for services where the full toolbar's shadow DOM styling visually conflicts with the page, or on lower-powered devices.
Configure per-service via the Plain Toolbar checkbox in Section 10.1. Both variants behave identically: same collapse/expand logic, same controls, same service-switching menu.
9. Hub Settings
↑ Back to topOpen via gear icon → Hub Settings. Controls the appearance and identity of the home page itself.
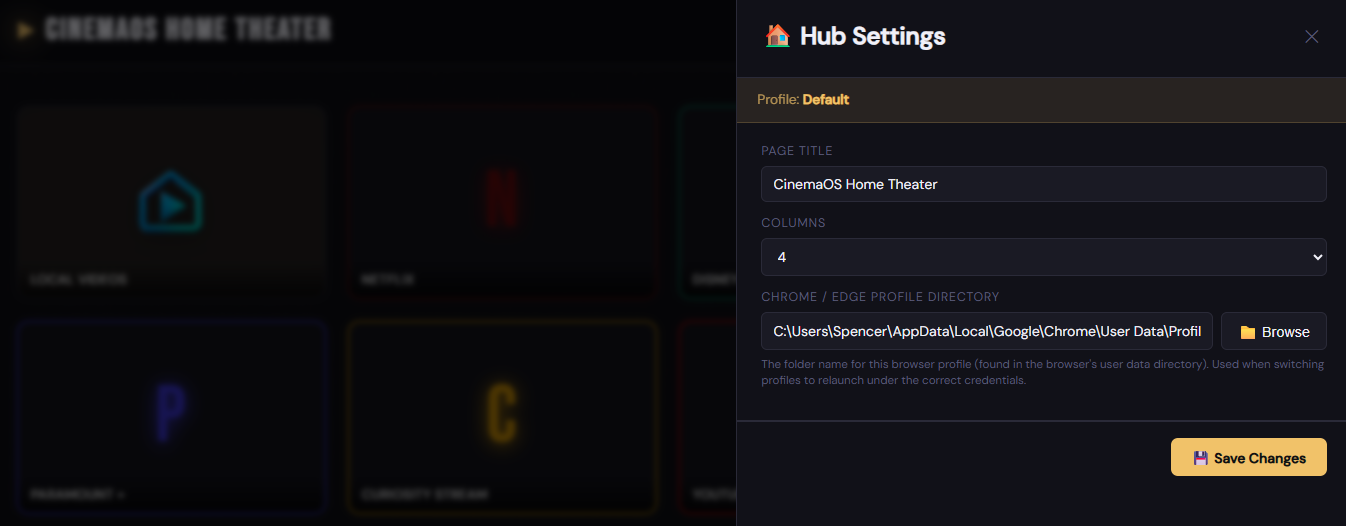
9.1 Title
The name displayed in the header bar. Default: CinemaOS. Change it to the name of your media room or household — for example "Living Room" or "The Batcave".
9.2 Columns
The number of columns in the service tile grid. Default: 4.
- Lower (2–3) for a TV viewed from a distance or fewer services.
- Higher (5–6) for a large monitor with many services.
9.3 Chrome Profile Directory
The file-system path to the Chrome or Edge profile directory. Set automatically at launch — override here only if you need to point CinemaOS at a profile directory manually. Click Browse to use a folder picker.
10. Managing Services & Apps
↑ Back to topOpen via gear icon → Services. This panel lists every service tile currently configured.
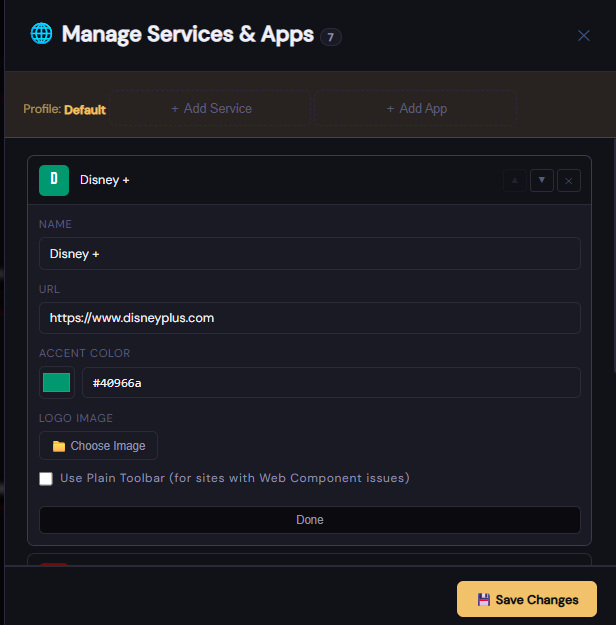
10.1 Adding a Streaming Service
- Click Add Service.
- Fill in: Name (e.g., "Netflix"), URL (e.g.,
https://www.netflix.com), Color, and optionally an Image thumbnail. - Use the ↑ ↓ buttons to set tile order.
- Click Save Configuration.
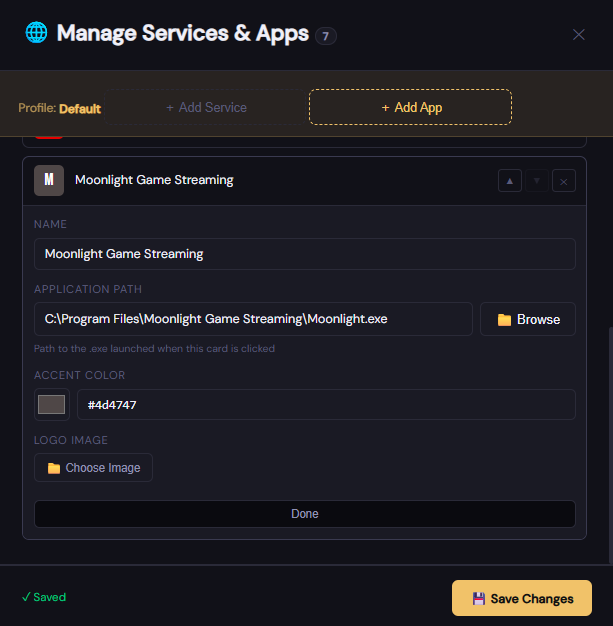
10.2 Adding a Local Application
- Click Add Application.
- Fill in Name and Executable Path (click Browse to pick the
.exefile). - Click Save Configuration.
Clicking an Application tile launches the executable directly — no browser navigation occurs.
10.3 Editing a Service or Application
Click the edit (pencil) icon on any tile to expand its edit form. Make changes and click Save Configuration.
10.4 Deleting a Service or Application
Click the delete (trash) icon and confirm the dialog. Click Save Configuration to write the change to disk.
10.5 Reordering Tiles
Use the ↑ and ↓ arrow buttons next to each service, then click Save Configuration.
11. App Settings — General
↑ Back to topOpen via gear icon → App Settings → General tab.
11.1 Server Port
Same as the port setting in Launcher Settings. Changing it here writes to the database; a server restart is required. A toast reminder is shown when you save.
11.2 Library Display Columns
The number of columns used in the Movie Library poster-card grid. Default: 0 (Auto).
- 0 (Auto) — calculates the best column count based on container width and a minimum card width of 180 px.
- Any positive integer — forces exactly that many columns. Useful for large TV displays where the auto calculation produces too many tiny cards.
12. App Settings — Torrent
↑ Back to topOpen via gear icon → App Settings → Torrent tab.
12.1 Torrent Search Provider
Selects which torrent index API is queried when you search for episodes or movies.
| Option | Best for | Notes |
|---|---|---|
| EZTV | TV shows | Default. Queries eztvx.to. Large index of English-language TV releases; results are matched by IMDB ID, so episode detection is reliable. |
| YTS | Movies | Specialises in high-quality compressed movie releases. Use this when your TV Programs list contains movies rather than TV series. |
| 1337x | Mixed | General-purpose index covering both movies and TV shows. Broader catalog but release naming is less consistent, which can affect duplicate detection. |
| The Pirate Bay | Mixed | One of the largest general torrent indexes. Good fallback if a title is not found on the other providers. |
| Custom | Any | Enter your own EZTV-compatible API base URL — useful for private trackers, regional mirrors, or self-hosted indexes. |
When Custom is selected, a Custom API Domain text field appears below the dropdown. Enter the full base URL of your API endpoint, for example:
12.2 Torrent Client
| Option | Notes |
|---|---|
| BiglyBT | Default. Fully supported; default path pre-filled. |
| qBittorrent | Auto-fills --skip-dialog=true as the default parameter. |
| Transmission | No default parameters. |
| Deluge | No default parameters. |
| aria2 | Auto-fills --seed-time=0. |
| Custom | Enter any path and parameters manually. |
12.3 Torrent Client Path
Full path to the torrent client executable. Click Browse to open a file picker. Example:
12.4 Torrent Client Parameters
Command-line arguments passed to the client when a magnet link is opened. The magnet URL is always appended as the final argument. Leave blank to use the client's default behavior (opens the add-torrent dialog). Example for qBittorrent:
13. App Settings — Video Player
↑ Back to topOpen via gear icon → App Settings → Video Player tab.
13.1 Video Player
| Option | Notes |
|---|---|
| VLC | Default. Recommended for broadest format support. |
| Windows Media Player | Built-in, no extra install needed. |
| MPV | Auto-fills --keep-open=no. Lightweight, high-quality playback. |
| MPC-HC | Media Player Classic — Home Cinema. |
| PotPlayer | Popular alternative; strong codec support. |
| Custom | Enter any path and parameters manually. |
13.2 Video Player Path
Full path to the video player executable. Click Browse to open a file picker. Example:
13.3 Video Player Parameters
Command-line arguments passed to the player when a file is opened. The file path is always appended as the final argument. Leave blank for most players. Example for MPV:
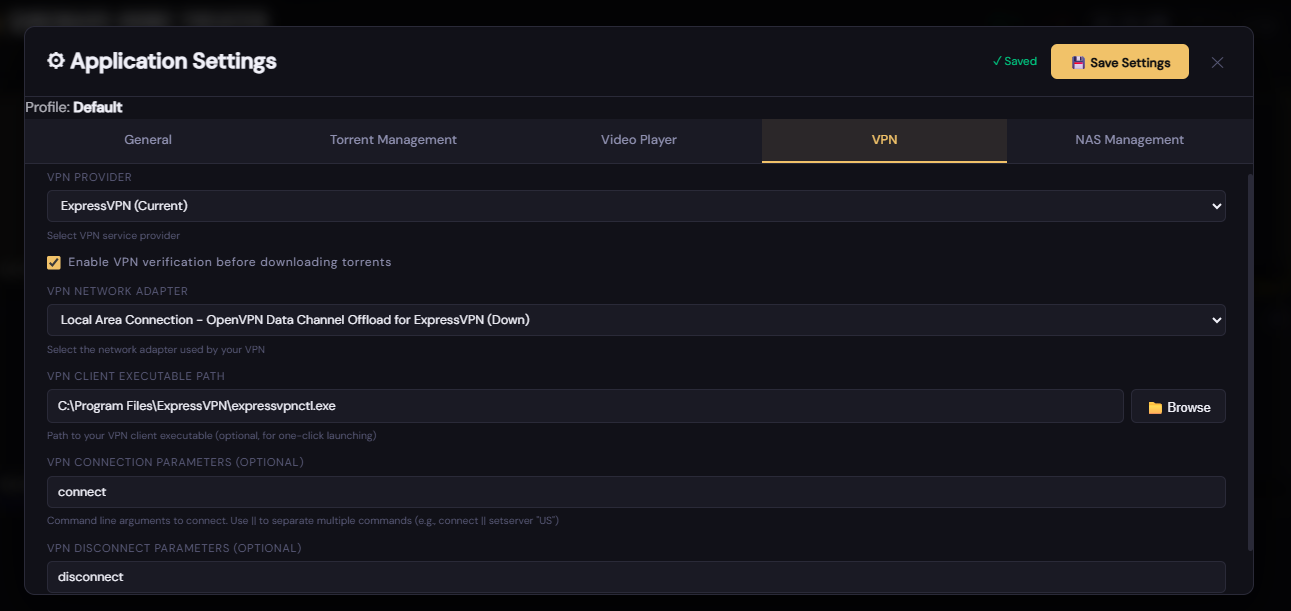
14. App Settings — VPN
↑ Back to topOpen via gear icon → App Settings → VPN tab. CinemaOS can monitor your VPN connection and optionally block torrent downloads when the VPN is disconnected.
14.1 Enable VPN Check
When enabled (default), CinemaOS checks VPN status every 30 seconds and displays the status pill in the home page header. When you attempt a torrent download while disconnected, a warning dialog appears.
14.2 VPN Provider
| Provider | Connect Parameters | Disconnect Parameters |
|---|---|---|
| ExpressVPN | (launch GUI, no args needed) | (empty) |
| Mullvad | connect | disconnect |
| ProtonVPN | c -f | d |
| NordVPN | -c | -d |
| WireGuard | up wg0 | down wg0 |
| Custom | (you fill in) | (you fill in) |
14.3 VPN Adapter Name
The name of the network adapter that becomes active when the VPN is connected. CinemaOS monitors this adapter to determine VPN state. Click Detect Adapters to see all current adapters.
14.4 VPN Client Path
Full path to the VPN client executable. Used when you click the VPN status pill in the header while disconnected.
14.5 Connection & Disconnect Parameters
Command-line arguments for connecting and disconnecting. Separate multiple sequential commands with ||:
14.6 VPN Status Indicator (Home Page)
- ● Connected — click to disconnect.
- ● Disconnected — click to launch the VPN client and connect.
- ● No adapter — no adapter configured; click does nothing.
15. App Settings — NAS
↑ Back to topOpen via gear icon → App Settings → NAS tab. CinemaOS can communicate with a TrueNAS (CORE or SCALE) device to check its status and send Wake-on-LAN / shutdown commands.
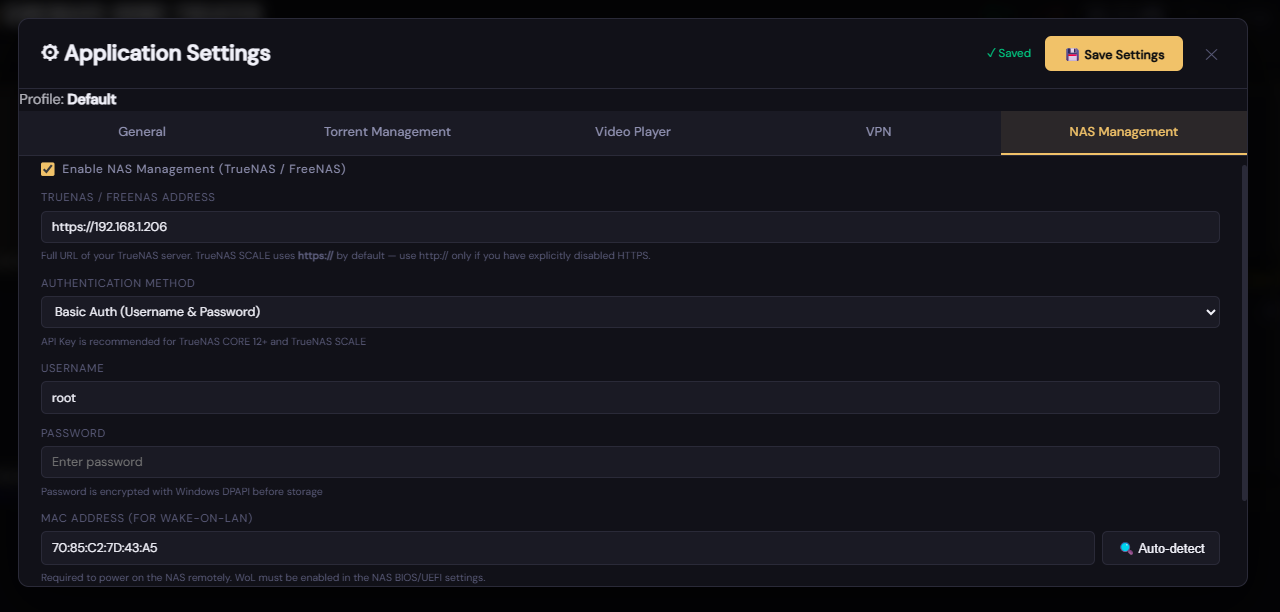
15.1 Enable NAS
Toggle on to activate NAS monitoring. When disabled, all NAS features are hidden and no network requests are made.
15.2 NAS Base URL
The HTTP/HTTPS address of your TrueNAS web interface, without a trailing slash. CinemaOS appends /api/v2.0/… to this base URL.
15.3 Authentication Type
| Option | When to use |
|---|---|
| API Key | Recommended. Generate a key in TrueNAS under System → API Keys. |
| Username / Password | Use if your TrueNAS version does not support API keys, or for quick testing. |
15.4 MAC Address (Wake-on-LAN)
The MAC address of the NAS's network adapter. Format: XX:XX:XX:XX:XX:XX. Click Auto-detect MAC to resolve it automatically via ARP (requires the NAS to be reachable).
15.5 NAS Status Indicator (Home Page)
- ● Online — NAS is running. Click to initiate a graceful shutdown.
- ● Offline — Click to send a Wake-on-LAN packet.
- ● Booting / Shutting down — Transitional; click does nothing.
16. Managing Video Directories
↑ Back to topOpen via gear icon → Manage Videos. Video directories tell CinemaOS where your local video files are stored. When at least one configured directory contains video files, a Local Videos tile automatically appears on the home page.
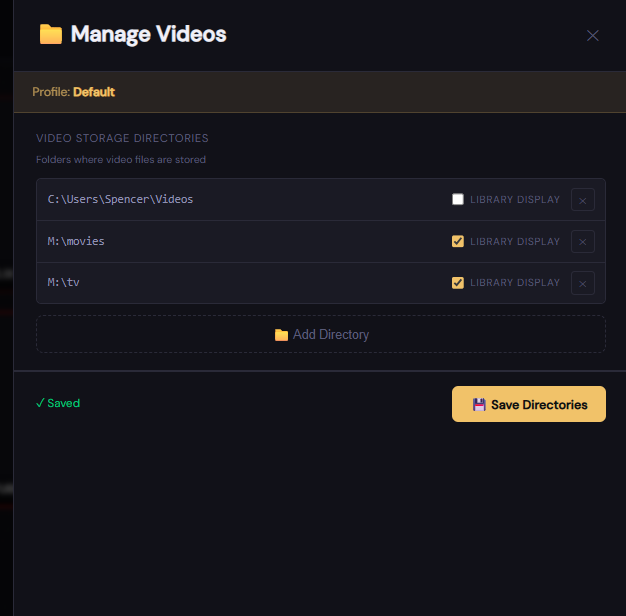
16.1 Adding a Directory
- Click Browse for Directory.
- Navigate to the root folder of your video collection (e.g.,
D:\Moviesor\\NAS\Media\TV Shows) and click OK. - Click Save Directories to persist.
16.2 Library Display Mode
| Setting | Behavior | Best for |
|---|---|---|
| Off (0) | Browse mode — shows a file/folder tree. | TV Shows, mixed folders |
| On (1) | Library mode — poster-card grid (one card per subdirectory). | Movies folder |
16.3 Removing a Directory
Click the ✕ button next to any directory, then click Save Directories.
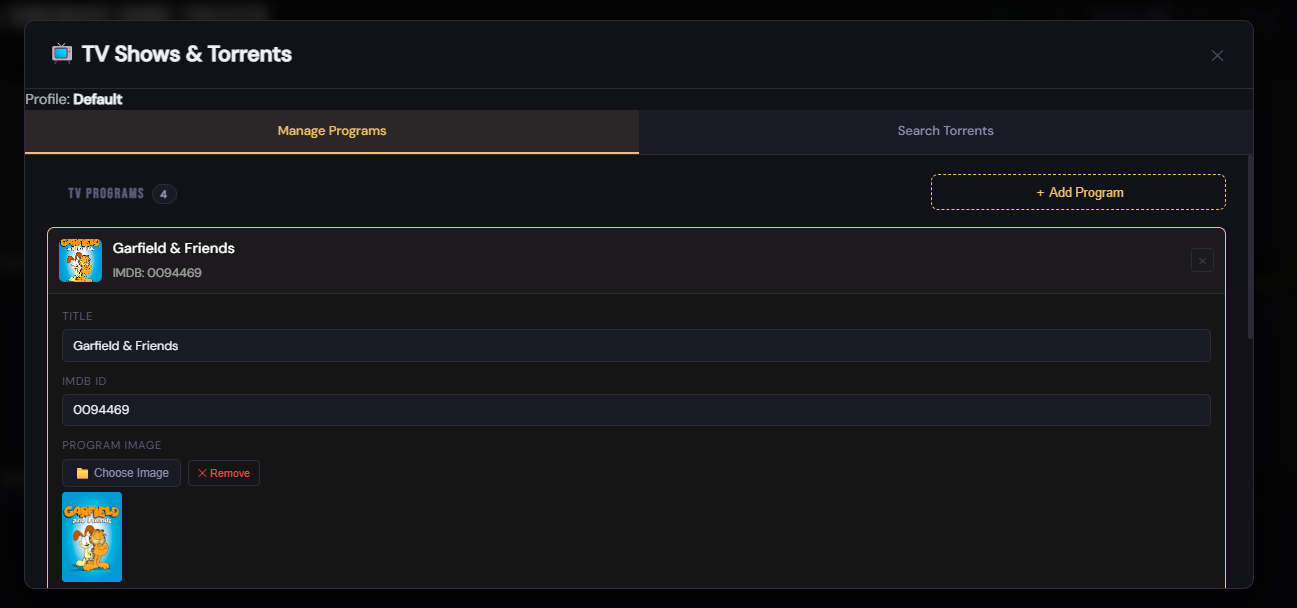
17. TV Programs & Torrent Manager
↑ Back to topOpen via gear icon → TV Programs / Torrents. This panel has two tabs: Programs and Search.
17.1 Programs Tab — Adding a Program
- Click Add Program.
- Fill in Title (e.g., "The Bear") and IMDB ID — the numeric part of the IMDB URL without the
ttprefix (e.g., fortt14452776enter14452776). - Optionally fill in Release Days, Tag Search (e.g.,
1080p), Save Path, and a poster Image. - Click Save Program.
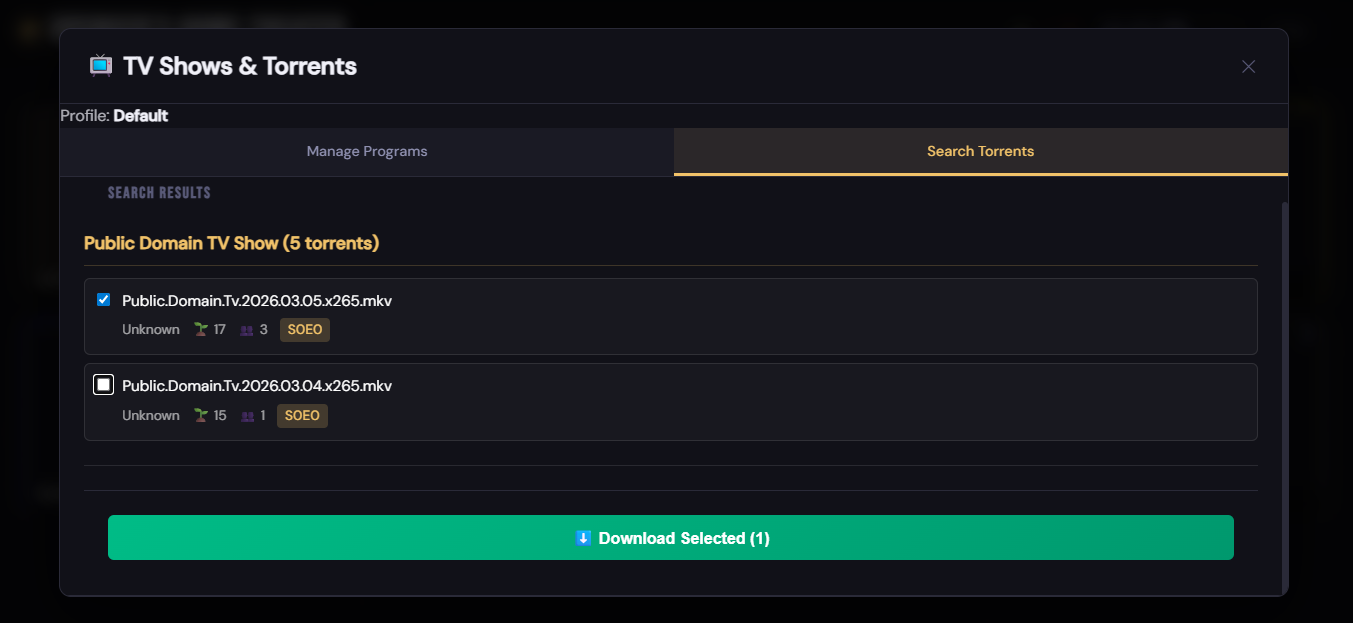
17.2 Search Tab — Running a Search
- On the Search Torrents tab, tick the checkbox next to each show you want to search.
- Click the Search Selected Programs tab. CinemaOS queries the torrent API for each selected program.
- Results appear grouped by program, showing filename, file size, seeds, and leeches.
- Select the torrents you want and click Download Selected.
17.3 Scan Existing Folder
If you already have episodes downloaded for a program, click Scan Folder on that program's row. CinemaOS scans the configured Save Path and records existing files in the download history so they won't be offered as new results in future searches.
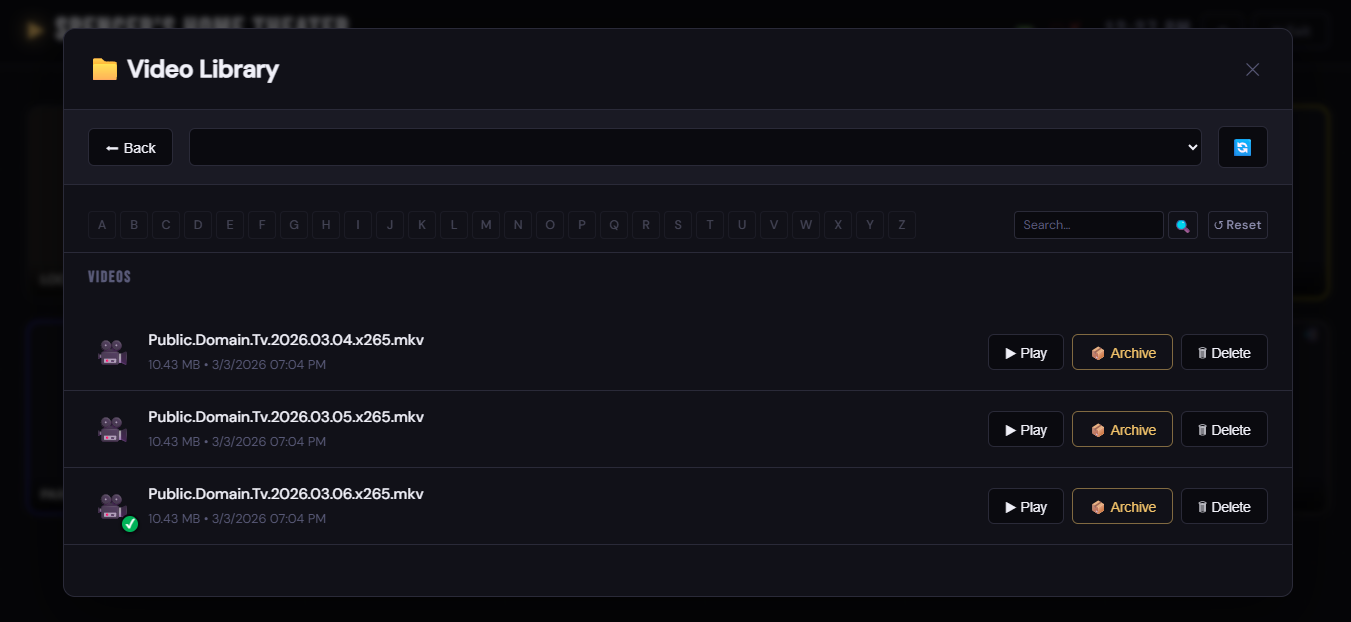
18. The Video Browser & Library
↑ Back to topClick a Local Videos tile on the home page to open the Video Browser.
18.1 Browse Mode (Library Display = Off)
Shows a navigable file/folder tree for the directory.
- Subdirectories — displayed as large buttons; click to navigate in.
- Video files — listed with ▶ Play and Delete / Archive buttons.
- Navigation breadcrumb — shows the current path with an Up button.
- Directory dropdown — switches between multiple configured directories.
- Alphabet filter — click a letter to filter subdirectories by starting letter.
- Search — type and press Enter to filter by name.
18.2 Library Mode (Movie Poster Grid)
When Library Display is On, the browser switches to a poster-card grid — one card per subdirectory (each subdirectory = one movie or TV show).
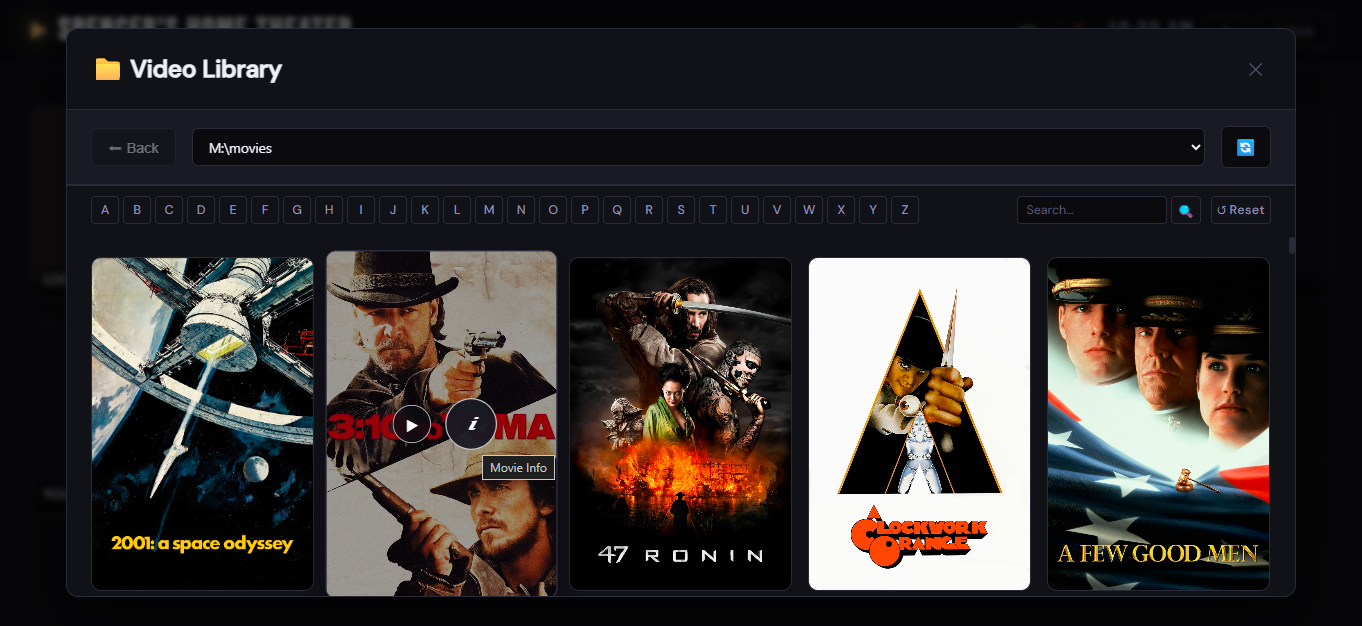
- Cards display a poster image found in the subdirectory, or a text fallback.
- Virtual scrolling lets thousands of cards render smoothly.
- Click Scan / Refresh to re-scan for new content. A progress indicator shows
Scanned X of Y.
18.3 Opening a Movie or TV Show
- Movie — click a poster card to open the Movie Info dialog, then click ▶ Play to launch your video player.
- TV Show — clicking the card opens a TV Show Info dialog with an episode list; click ▶ Play on any episode.
18.4 Deleting and Archiving
- Delete — permanently removes the file from disk.
- Archive — removes the file from disk but keeps a record in the CinemaOS database (shows as "played / owned" in the library). Use this to free disk space without losing the history entry.
19. Air Mouse & Key Mappings (Advanced)
↑ Back to topIf your air mouse or media remote sends non-standard key codes, CinemaOS can translate them via a keyMappings.json file.
19.1 File Location
Create this file if it does not exist — CinemaOS runs fine without it.
19.2 File Format
- keyCode — Windows virtual key code (decimal integer).
- modifiers — bitmask:
0= none,1= Alt,2= Ctrl,4= Shift.
The example above maps key code 194 to VK_BROWSER_HOME (172), triggering the CinemaOS toolbar overlay.
19.3 Applying Changes
Edit keyMappings.json, then restart CinemaOS (right-click tray → Exit, then relaunch). Mappings are loaded once at startup.
20. Trial & Registration
↑ Back to topCinemaOS includes a 14-day free trial with full functionality. No credit card or account is required to start the trial.
20.1 Trial Period
On first launch CinemaOS records the date in the Windows registry. Remaining days are shown on the Profile Selector and in Launcher Settings.
20.2 Registering
- Purchase a license at cinemaos.app. You will receive a registration key by email.
- Open Launcher Settings (right-click tray → Settings).
- Enter your Email and Registration Key.
- The status label shows "✓ Registered" when the key is valid.
- Click Save & Restart.
20.3 After the Trial Expires
If the trial expires before you register, CinemaOS shows a registration prompt on launch. Entering a valid key at any time unlocks the application permanently.
21. Troubleshooting
↑ Back to topThe home page shows "Could not load config. Is the server running?"
The browser navigated to http://localhost:3000 but the embedded server is not responding.
- Check that CinemaOS is still running — look for the tray icon. If missing, relaunch
CinemaOS.exe. - Check that no firewall or antivirus is blocking
CinemaOS.exefrom listening on the configured port. - If you changed the server port, make sure the browser is navigating to the correct address (e.g.,
http://localhost:8080).
The browser extension shows as disconnected
- Navigate to
chrome://extensions, find CinemaOS, and confirm it is enabled. - If the extension was recently updated with a new installer, click Reload on the extension card.
- Make sure you are using the same browser profile that was selected at launch.
Clicking a service tile does nothing (no navigation)
- The extension must be installed and active for tile clicks to navigate. See Section 5.
- If no extension is installed, tile clicks fall back to direct
window.location.hrefnavigation and a toast appears: "Extension not installed. Use browser back button to return."
VPN status always shows "No VPN adapter configured"
- Open App Settings → VPN and enter the exact name of the VPN network adapter in the VPN Adapter Name field.
- Connect your VPN, open a Command Prompt, and run
ipconfig. Copy the adapter name exactly, including capitalisation.
Torrent downloads do not start
- Verify the Torrent Client Path points to a valid
.exefile on disk. - Try launching the torrent client manually with a magnet link to confirm it works outside CinemaOS.
- Check that VPN checking is not blocking the download — either connect your VPN or disable the check in settings.
NAS shows offline despite being powered on
- Confirm the NAS Base URL is reachable from a browser on the same PC.
- Check that the API key or credentials are correct in App Settings → NAS.
- TrueNAS SCALE returns state
RUNNING; TrueNAS CORE returnsREADY. Both are treated as online by CinemaOS.
Where are the log files?
Enable logging in Launcher Settings → Enable diagnostic logging, reproduce the problem, then share the log file with support:
How do I completely uninstall CinemaOS?
- Right-click the tray icon → Exit to stop the running instance.
- Open Settings → Apps in Windows and uninstall CinemaOS.
- The uninstaller removes application files. Data files (
config.db,torrents.db) and logs in%APPDATA%\CinemaOSare left in place — delete those folders manually for a clean removal.